History of makeup: the origin of makeup : If you are Interested in the word, Makeup. Then you surely want to know its history. Since ancient times it has been used as an artistic manifestation. Throughout the time it has been present in aesthetic trends. We explain how it was born and how it has evolved to become what it is today. Attention to this article to know in depth the history of makeup.
Table of Contents
The Origins of Makeup. Pre history and Ancient Egypt
Human beings have long used color as an aesthetic element of verbal communication to highlight aspects of their anatomy, to produce certain effects on behavior or simply to transmit moods.
The origin of makeup dates back centuries, specifically to Prehistory. In this period clay was applied to the face but it is not clear what the purpose of this action was. According to cave paintings of the time, Paleolithic women colored different parts of their bodies with reddish brown.
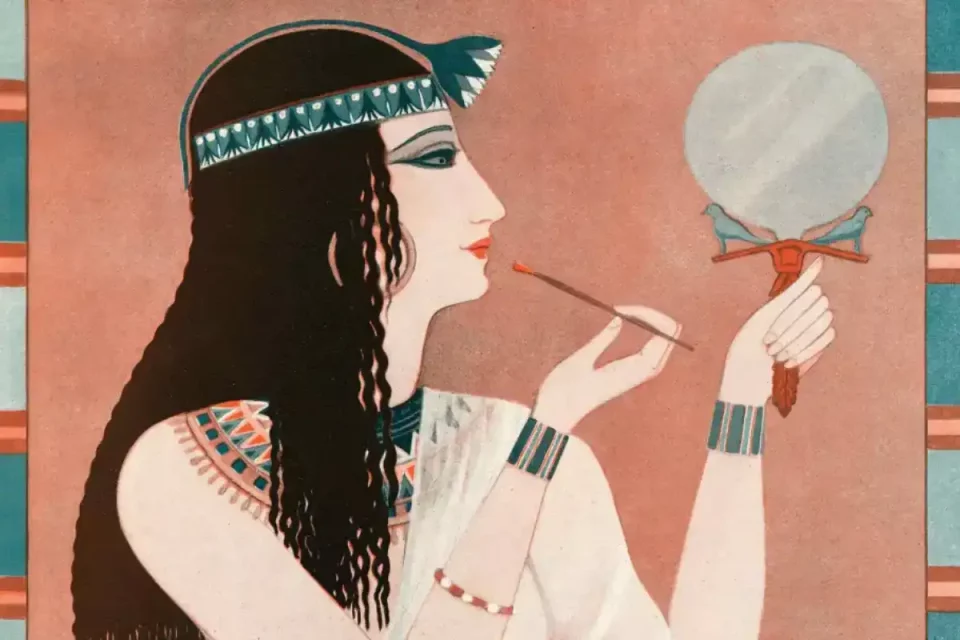
In ancient Egypt, black and green powders were used by men and women interchangeably to paint their eyes. His ideal of beauty was a tanned skin, large eyes outlined in the shape of a fish in dark color, lips colored in terracotta tones and very careful eyebrows as we can see in the busts of the time.
In addition to sun protection, people believed that makeup also protected them from disease. They were not wrong since the black kohl and other powders they used on the eyelids contained lead salts that strengthen the immune system.
Some historians considered Egypt as the cradle of makeup. To obtain the color with which the eyes were painted, they mixed earth, ink and ashes. For the lips the Egyptians used a dye made of red ocher and natural iron oxide that they applied with a brush.
In the tombs of the pharaohs, remains of cosmetic products were found that were not far from the current makeup. In fact, the current rouge derives from a mixture made in Ancient Egypt that consisted of seeds, red ocher and different fruits.
Makeup History: The Makeup Renaissance
In the Middle Ages, personal care in women was frowned upon so makeup took a back seat. However, with the arrival of the Renaissance, makeup is transformed.
At this moment the ideal of beauty is that of a woman with a curved body with whitish skin, sparse eyebrows and a very clear forehead. Makeup is applied to the eyes with Kohl and a maroon type of blush is usually used, the eyelids are colored with blue or green and the lips have intense red colors in the shape of a heart.
In the Renaissance, cosmetics returned with unusual strength. The feminine aesthetic envelops the life of Renaissance Italy.
In the 16th century, the monks of Santa María Novella created the first great laboratory of cosmetic and medicinal products. The first cosmetic and beauty treatises appeared in France and Italy during these centuries. In the 16th century, English nobles made the use of lead makeup fashionable. Queen Elizabeth I herself applied it to cover her smallpox scars. In his court, sage was popularized to whiten teeth and geranium petals as lipstick and other mercury-based products to color them.
The Triumph of Pale Makeup
In the 17th and 18th centuries there was an obsession for pale faces. Dusted with talcum powder or rice flour powder on the neck and neckline and some stains such as artificially painted polka dots.
France set the canon of beauty. Showing oneself with colored eyes and cheeks was frowned upon. So in the absence of blush, the skin was pinched so that the blood pigmented the cheekbones.
In these centuries it is also necessary to remember the makeup in Asia. Specifically in Japan with its Geishas. Her makeup was a distinctive to enhance her features with insinuation. Her white makeup covered her face, neck, chest and hands, with two or three unpainted areas (forming a “W” or “V”) near the nape to accentuate this erotic zone, and a bare patch of skin around her hair. .
The eyes and eyebrows were highlighted with charcoal. Maiko (Geisha’s apprentice) also wore red around their eyes. The lips were painted with a brush establishing a heart-shaped outline above and below.
Also, find more helpful resources at healths unlimited
What is Butterfly Locs? (And what they aren’t).
This new fashion of locks looks very similar to a defensive fashion staple: distressed locs. Distressed locs are the unconventional cousin of the neat faux locks that became popular years ago. Still, the one distinction between distressed & Butterfly Locs is the curly loops shaped in the Butterfly Loc, giving them their signature appearance.
Butterfly Locs are like the precise blend of goddess locs and passion twists. The messy, bohemian style is ethereal, low preservation, and very natural searching. So for those who want a type that modifications through the years, doesn’t require a lot of fuss to make it paintings, and celebrates curls and coils while still protecting our hair, this fashion may be for you.
What Kind of Hair to Use & How Much
You could want hairstyles depending on how long your usual hair is and how lengthy you want your locs to be. If you wish to locks that aren’t longer than your hair, you’ll need 6-8 packs of a few kinds of water wave hair in 22-28 inches. This hair is curly & bouncy, and that’s what will come up with the feature loops that supply Butterfly Locs their name.
If you go with lots that are longer than your hair, you’ll need filler hair. Technically, you may use the wavy hair to fill the locs too, and should buy more of it for that motive. But many classes use Marley hair to create a character braid that you’ll shawl with the wavy hair. Then, braid Marley’s hair into your hair to the preferred length.
Most stylists create forty-50 locs, and you must ensure they aren’t too bulky. In addition, more extended patterns tend to have thinner locks vs. the jumbo loss seen in shorter styles. This reduces the load of the hair and, as a result, the tension in your scalp.
How to Do Butterfly Locs
There are a couple of one-of-a-kind methods for putting in Butterfly Locs, but no matter the technique you use, you may want to start by first soaking the hair you’ve bought (if it’s synthetic) in an Apple Cider rinse. Usually, one part vinegar, elements water suffices. Then, soak the hair for multiple hours and rinse it very well. This enables you to avoid itching if you have a sensitive scalp.
Braid and Wrap Method
There is an expansion of approaches you may reap Butterfly Locs, relying on how much time you have, your ability degree, and your persistence. The remarkable aspect approximately this style is you don’t have to be a grasp hair braider to obtain a beautiful result. Most human beings can do that fashion in 3-6 hours; however, the longer the duration, the greater time-consuming it can be.
Step 1: Braid twists your hair.
Choose a parting pattern & braid or twist your hair. Use Shine and Jam or any area manipulate to hold the parts neat. You can select to apply rubber bands as visible underneath in The Chic Natural’s video; however, you don’t ought to. (If you’re adding to the period of your hair, be sure to braid the Marley hair in at this factor, or you may braid the water wave hair in as The Chic Natural does in her tutorial.)
Step 2: Prep your Water Wave hair.
This step can be completed as you go, or you could do it all inside the starting. Take two portions of the water wave hair & separate them. You want the effect to be fluffy but pretty together.
Step 3: Crochet Water Wave hair into the bottom of your braid.
Take the crochet needle and region it via the bottom of your braid, by your scalp. Put the unglued water wave hair in the needle’s hook near it, and pull it much less than halfway. To begin wrapping, you’ll want approximately ¾ of the water wave hair on one facet. If you’re familiar with fake loc strategies, that is similar to how you’d begin the field braid extension underneath the faux loc.
Step 4: Begin to wrap
Now clutch the shorter piece of the water wave hair and preserve it with your braid. Then start wrapping the braid, and the more straightforward work against it, with the longer part of water wave hair. You’ll want to cover the basis of 5-6 instances to ensure it’s far comfortable against the scalp. (This will assist in maintaining your fashion searching neat for a more extended period.) But try now not to apply an excessive amount of anxiety. As you wrap, use the pollex technique to create the loops.
The first-rate factor approximately Butterfly Locs is that it’s ok to be disordered. Be messy while you’re wrapping your hair. They don’t must be tight or controlled; the splendor is in the loops & fuzziness of the loc. These locs appear higher over time; the messier, the higher, so don’t be afraid to embody the frizz they age.
The Thumb Technique
As you wrap water wave hair, wrap an element around your thumb loosely as you continue wrapping down two or three instances. This will supply the loc of the signature loops. Some stylists advocate doing three everyday wraps, after which placing the thumb to “select up” some of the hair earlier than returning it to the wrapping section.
Step 5: Seal the Ends.
Once you attain your preferred period, you’ll need to close off the loc and seal the ends. You can achieve this by developing a small loop with your finger at the end, then wrapping the final hair returned up the braid till you run out of water wave hair. You use nail glue as you’re wrapping the ultimate inch or for extra preservation. The loop is vital; it will give you a nice give up to your loc and hold the loc comfy. Do NOT burn the end.
The Crochet Methods
If you’re more contented with the crochet method–which takes much less time–you can cornrow down your hair. However, I advise leaving the back and front out for individual braids/twists so your fashion has a few versatilities. Adanna Madueke does an excellent job showing how she incorporates both strategies. (Here are the pros and cons (common pros) of the use of the crochet technique to create field braids and styles that find it irresistible.)
THIS academic might be the best to watch if you’re into the crochet method. Mary K Bella indicates how she uses the crochet approach with hair that isn’t pre-Loc’d, which is useful now as there aren’t a TON of already loc’d Butterfly Locs hair. She’s also undoubtedly funny. I propose looking at the entire video.
Butterfly Locs on Longer Hair
If you have lengthy hair but need to rock bob-period locs, it’s virtually simpler than you suspect –no haircut vital! Instead, check out the education below on the way to fold your braids before wrapping.
Maintenance & fresh Butterfly Locs
Keeping your fashion adequately maintained and your scalp wholesome is crucial to having a defensive style. Make sure your hairs is washed, deep-conditioned, and sufficiently moisturized before installing the locs, and you’ll also want to do periodic maintenance with this style.
Check out Naturally Sunny’s video on renovation and a way to refresh locs at the 2-week factor. Essentially, to hold your locs:
- Keep oil reachable to rub down your scalp and ensure it’s clean and moisturized.
- Use mousse to hold flyaways at bay and to offer your Butterfly Locs a “completed” look.
- You might also need to re-wrap a few locs right here and there, and use some part manipulate on new growth.
Searches Related to Makeup
- [pokimane no makeup]
- [milk makeup]
- [makeup revolution]
- [makeup brushes]
- [clown makeup]
- [belle delphine no makeup]
- [seint makeup]
- [makeup organizer]
- [mac makeup]
- [marilyn manson no makeup]
- [halloween makeup]
- [pokimane without makeup]
- [pokimane no makeup]
- [permanent makeup]
- [chanel makeup]
- [goth makeup]
- messy bun
- makeup.com
- how to remove press on nails
- eyeshadow looks
- beauty tips
- butterfly locs
- replica perfume
- makeup palette
- indian makeup
- how to take off press on nails
- makeup tutorials